Each ClockTHREE is Unique

Adam and Julie

I am coming to appreciate a cool fact about ClockTHREE and ClockTHREEjr: Each clock is unique. With the custom faceplate and imminently custimizable firmware, no two clocks are alike. This is possible because, even though the entire design is digital, the format allows easy modification.  We have helped several customers  to design thier perfect clock.

Pictured above is a clock to commemorate Adam and Julies recent nuptial ceremony.  This two-tone clock will celebrate their anniversary each year by scrolling an anniversarial message throughout the happy day.


I2SD Hello World!

Photo by FlorinC

So WyoLum is working on the I2SD. This is a SD card interface that sits on the I2C bus, also known as the Two Wire Interface or TWI.  We created the board so that we could add an SD card to ClockTHREE and ClockTHREEjr .  But while we were at it, we made this board as useful as we could so that it can be used in several applications.

Features:

  • Can be used as a stand alone data logger.
  • Arduino Shield adding real time clock and SD to any Arduino.  This saves 8KB of program memory over just using the SD library.
  • Chronodot compatible! This means you can add an SD card to any project that already has a ChronoDot slot.
  • Integrated Real time clock.
  • Two LEDs, no WyoLum project is complete without LEDs.


Hello World

Required Parts

  1. Arduino
  2. I2SD

Steps

  1. Write a long file to the SD card called “TEST.TXT”  For example this one.
  2. Connect I2SD to the Arduino.
  3. Upload code below to the Arduino.
  4. Monitor the serial port on the Arduino.

If everything goes right, the file on the SD card should stream through the serial port on the Arduino.  If an error occurs, an “error code” will flash on the I2SD.  This is all pretty new, so you may encounter unforeseen situations.  If so, just let me know and I will address them as soon as I can.

The Code

/*
Read and write some data to the I2SD
*/

#include "C3SB.h"
#include "I2SD.h"
#include "SD.h"
#include "Wire.h"
const boolean WRITE_TEST = true;
const int DBG = 13;

I2SD i2sd;

void setup(){
  uint8_t msg_back[100];
  unsigned long n_byte;

  Serial.begin(57600);
  Wire.begin(); // DON'T FORGET THIS!!!!

// wait for I2SD hardware to start up
  Serial.println("PING...");
  while(!i2sd.ping((uint8_t*)"PING", 4)){
    delay(100);
  }
  Serial.println("PONG received");

  i2sd.open("TEST.TXT", FILE_READ);
}

void loop(){
  const int n_byte = 32 * 7;
  char big_data[n_byte];

  i2sd.read((uint8_t*)big_data, n_byte);
  Serial.print(big_data);
}

Re-Programming ClockTHREE and ClockTHREEjr

At some point, you may wish to re-program your ClockTHREE or ClockTHREEjr or maybe you are building a clock from scratch.  This post will walk you through the steps.

(Sorry, the formatting is not behaving.  Try this file if you are having trouble.)

Outline:

  1. Download and install Arduino for your target platform.  (More details can be found here.)
    • Navigate to the Arduino download site: http://arduino.cc/en/Main/Software
    • Download Arduino for your platform.
    • Unzip the file to the directory of your choice.  (We will refer to whatever directory you choose as <arduino_dir>).  I use c:\arduino\ on Windows or /home/justin/arduino/ on Linux so that (for arduino 22 for instance) the path extracted executable is c:\arduino\arduino-0022\arduino.exe on Windows or /home/justin/arduino/arduino-0022/arduino on Linux.
  2. Download and install ClockTHREE source code
    • Download the latest ClockTHREE library source code file from here: http://code.google.com/p/clockthree/downloads/list
    • Unzip the library source code file in your home directory. I use “My Documents\sketechbook\” on windows and /home/justin/sketchbook/ on linux.  We will refer to the directory you choose as <sketchbook>.
  3. Point Arduino to your newly extracted library files.
    • Start arduino (look here if you have trouble with this step)
    • Click File->Preferences to pull up the preferences menu.
    • Leave “Use external editor” unchecked if you plan on using Arduino as your editor.
    • Click the “Browse” button and navigate to your <sketchbook> directory from step 2.
    • Click “OK”.
    • Close and restart Arduino
    • Click “File->Sketchbook->libraries”.  If “ClockTHREE” is listed you’ve done well.
  4. Using a text editor, edit source code: set compile options and language
    • On or about line 55 in the file <sketchbook>/libraries/ClockTHREE/ClockTHREE.h, uncomment (for ClockTHREEJr) or comment out (for ClockTHREE) the following line.
    #define CLOCKTHREEJR // uncomment this line for ClockTHREEjr
    
    • On or about line 32 of <sketchbook>/libraries/ClockTHREE/examples/ClockTHREE_02.pde, comment out all but one of the following lines depending on language and hardware.
    // #include "english.h" // only need one language at a time
    // #include "german.h"
    #include "english_jr.h"
    // #include "german_jr.h"
    
    • On or about line 292 of <sketchbook>/libraries/ClockTHREE/examples/ClockTHREE_02.pde, comment out all but one of the following lines depending on language and hardware.
    // English faceplate = English();      // Only need one at a time
    // German faceplate = German();
    EnglishJr faceplate = EnglishJr();
    // GermanJr faceplate = GermanJr();
    
  5. Compile and upload
    • Connect the FTDI cable to ClockTHREE (mind color labels) and to your computer.
    • Click Tools->Boards->Duemilanove
    • Select USB port Tools->Serial Port (this may take some trial and error if you have several devices connected).
    • Compile and upload <sketchbook>/libraries/ClockTHREE/examples/ClockTHREE_02.pde.
      Click the arrow button, second from the right.  Right when the black message area at the bottom of the Arduino window displays the message “Binary sketch size:…” click the reset button on ClockTHREE.  The timing can be tricky so you may have to experiment. 
  6. Congratulations!  That is it.  Now you can customize the code to your hearts content!

Announcement: I2SD, A disk drive for Arduino

WyoLum is proud to announce I2SD which provides disk drive storage to your Arduino based project.

I2SD is an I2C interface for an SD card compatible with ClockTHREE and ClockTHREEjr.  The idea behind I2SD is to allow easy read/write access to files stored on an SD card.  If the I2C bus is already part of a circuit, I2SD does not require any extra pins, therefore optimizing pin usage on the micro.

Thanks to AdaFruit and SparkFun for sharing there SD designs!

Why I2SD? Good question!  After all there are a few boards that allow you to connect an SD card to your project: AdaFruit’s data logging shield, and SparkFun’s MicroSD shield are two stand outs in this category.

There are three reasons you should consider I2SD:

  1. ATMEGA328 memory limitations.
  2. ATMEGA328 pin count.
  3. You want a small form factor stand alone data logger.

On ClockTHREE we are both pin count and memory limited and we wanted to be able to store lots of cool animations.  We designed for the stand alone data logger as a target of opportunity.


The next rev will sport optional locations for an RTC chip and battery back up.
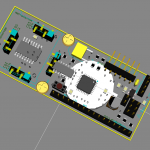
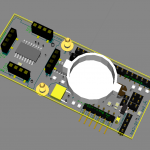
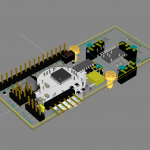
Details

Components:

  • ATMEGA328
  • SD card
  • 2 LEDs
  • ChronoDot or DS3231 (optional)

Interfaces:

  • 6-pin ISP
  • FTDI
  • 2x C3SB (see below)
  • Buckler (see below)

Using I2SD from an Arduino Master (Buckler interface see below)

Currently there are five methods implemented for simple file reading and writing.

  ping(uint8_t* ping_data, uint8_t n_byte);
  seek(unsigned long addr);
  open(char* filename, uint8_t mode);
  read(uint8_t *data, uint8_t n_byte);
  write(uint8_t *data, uint8_t n_byte);
Which can be used to read and write a small file:

 //Write a file
 i2sd.open("NEW_FILE.TXT", FILE_WRITE);
 char* msg="Hello from I2SD_Client.pde. "
           "Please note this is longer than 32 chararters.";
 i2sd.write((uint8_t*)msg, strlen(msg) + 1);

//Read it back
 i2sd.open("NEW_FILE.TXT", FILE_READ);
 uint8_t msg_back[100];
 unsigned long n_byte = i2sd.read(msg_back, 100);
 msg_back[n_byte] = NULL;
 Serial.println((char*)msg_back);
 write(uint8_t *data, uint8_t n_byte);

C3SB (preview)

This is the first peripheral to implement the ClockTHREE Serial Bus interface which deserves a post of its own (coming).   Its like USB for Arduino which allows the connection of many peripherals without increasing pin usage.  C3SB is build on I2C


C3SB physical interface, 4 pins with 0.1″ spacing:

  1. VCC — 5V min 100mA
  2. SCL — I2C Clock pin
  3. SDA — I2C Data pin
  4. GND — +0V

C3SB software Master interface:

I2C transfers are limited to 32 bytes.  The C3SB allows up to 255 bytes by breaking them up to 32-byte I2C packets for you.  Two read/write functions.

uint8_t read_from(uint8_t device_id,
                  uint8_t* dest,
                  uint8_t n_byte);

boolean write_to(uint8_t device_id,
                 uint8_t *payload,
                 uint8_t n_byte);

Buckler form factor (preview)

A “buckler” is a small shield, 15 to 45 cm (6 in to 18 in) in diameter , gripped in the fist (From Wikipedia).  I2SD is a small shield so we thought this was a clever name for this form factor.