

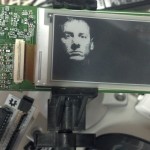
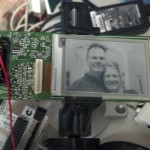
I love the new e-paper offered by Pervasive Displays and sold by AdaFruit. They are a bit tricky to get started with however. By default, they only display images, no text or standard graphics calls like “line” and “circle” and each image takes a lot of memory. Too much for a stand alone Arduino UNO.
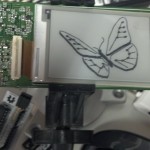
Even if you have the memory, another tricky thing about them is getting an image to look good in pure black and white (no greys).
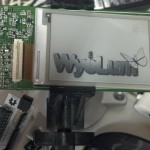
At WyoLum, we have tackled all of these problems and figured out how to display UNICODE chars, and draw graphics (lines and circles). We’ve chosen to use an SD card as both a file source and a screen buffer. It is working well. Most of this is just in test code state, but we figure there are others out there struggling with the same issues and might find our solutions handy.
Quick Start:
- Crop images with Inkscape and export as png
- Convert png to WIF in IMAGES directory on SD card
- Load AlaModeEPD on your SD extended Arduino (we use AlaMode of coarse)
Slow Start:
The subject of this post is the WyoLum Image Format, as well as how to create and display images on repaper displays. This binary format is nearly a direct translation of the XBM format except rather than C-code written in ASCII, it is binary.
The first two bytes are the image pixel height as an unsigned integer in “little endian” format (least significant byte first). The next two bytes are the image pixel width as an unsigned integer again little endian. The remaining bytes contain the pixel data, row by row.
I’ve written a little python program called greyscale.py to convert standard image files into WIF. It is a bit of a misnomer to call it “grey scale” as each pixel is either black or white. Greys are created with varying densities of dark pixels. This is a non-trivial task. I love how the Python Image Library makes this so easy. To use it, first resize your image with your favorite image editor to the correct size for your e-paper display:
1.44" --> W=128 and H=96 (pixels)
2.00" --> W=200 and H=96
2.70" --> W=264 and H=176
Inkscape, or Gimp work great for this. I’ll use Inkscape for this example.
 After starting Inkscape, open your document properties found under the file menu. Set the width and height to the pixel size for your display in the “Custom size” box. Now draw a hollow box the fills the entire page. This box is used to center the area of interest in the display area. (Note that when the box is selected you can use the text entry fields on the top labeled “W” and “H” to get the exact size on the box in pixels. Set x and y both to 0). If your box is filled in, you can hollow it out by clicking the “X” above “Fill” in the lower left hand corner of the window.
Now find an image you’d like to convert. I will use Lena, an image processing classic for it’s rich mixture of high and low frequency content, lights, darks and greys. Use “File–>Import” to load your image. Select “embed” when the dialog pops up and click “ok”.
There are two things wrong here: we’ve hidden the page size and the image starts off too big. To push the image to the bottom of the object stack, press the “end” button on your keyboard. Then, with the aspect ratio lock closed (top center of GUI) re size the image for the display. Make sure you move the image and not the box.
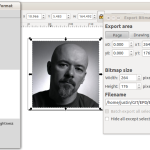
Now export the page using “File–>Export Bitmap”. Click “Page” to export only the page area, make sure the Width and Height are correct, type a filename and click “Export”. If you use the “Browse” button, you still have to click “Export” after you have selected your filename.
Now start greyscale.py using the command “python greyscale.py” on the command line or double clicking the filename. You will need to have the Python Image Library installed in your python distribution (try Enthought Canopy distro if you are starting from scratch for one click install). An empty canvas should pop up.
Use the “File->Open” menu command to find the file you just created. LENA3.png in my case. Adjust the target size from the “Size” menu. Adjust the Contrast and Brightness sliders until you are happy with the result.
Save the image in WIF using the “File–>Save” menu item. Your files should conform to the old 8.3 dos filename format (HAPPYDAY.WIF for instance) to avoid FAT hassles. The greyscale.py program will do its best to help you on this. Repeat the process with as many pictures as you want.
Display the Images
Aside from the repaper breakout board, you will need an Arduino set up according to the display Pin Assignment and an SD shield (AlaMode with onboard uSD slot works great for this ;-)). Copy all of your newly created “WIF” files into a directory called “IMAGES/” on your SD card. And load this demo program from the Arduino environment.


